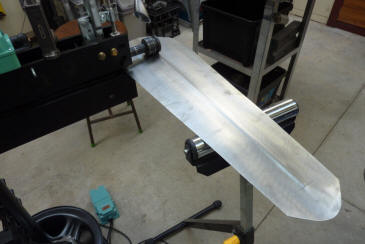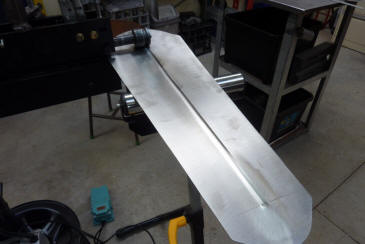

I do the first pass in the opposite direction than the final bead will be. This helps stretch the area to reduce distortion from the shrinkage the bead makes. Turned it over and formed the bead back the other way. This is the second and final pass and the piece flattened out nicely.
To fold the short section at the different angle to the rest, I just used my vice folder and finished it off with hammering over a stake dolly. All finished and total cost to me was just $30AUD, or $20 USD for the two switches. Everything else I had or found. :)
Ready for some work. :) I made this foot rest out of old 316 stainless.
Was a good test to see how the bead roller behaved. What I have noticed in use is what was fine when using mild steel, didn't work as well when using hard stainless as would be expected. I had to do an extra pass as there was some flex I believe coming from the extra 2" that the shafts were beyond the end of the frame and pillow blocks than stock.
So rather than slide the shafts back, I extended the frame by welding in plate at the ends and moving everything to the ends. Another thing I noticed was when doing tight turn radiuses, it was too fast. So it is now geared with the same tooth count at each end and only turning at 1.7 rpm. With 2" rollers that calculates out to 10.7" per minute travel speed. I'd rather be accurate and slow than fast and have to fix where I couldn't follow the line exactly. I left the chain guard as is so I can put back the the bigger sprocket just in case I have a job with a lot of long straight lines.
I wanted better lighting when using the beadroller. Got these LED desk lamps from Bunnings as a present from my in-laws. https://www.bunnings.com.au/verve-design-5w-1-8m-cord-led-aren-clamp-lamp_p4370908 They only draw 0.35 amps and are converted to 12v DC. I found an old double compact power point from my dads stash. It had round earth pins for special purpose equipment. These lights didn't have an earth pin at all so I could still use it. I ran a cable back to the live side of the foot switch from there so I still have light when the pedal is not depressed.
I only used part of the original clamp bracket and mounted them each side of the quick release clamp leaving plenty of room to use it still. The on-off switches they came with are mounted on each side of the motor control switch.
They are on flexible stalks so can move them to where they are needed. I got two mainly so I didn't have to switch it from side to side depending on what side I was feeding work it through from. Left both are on and the right photo only one. Still plenty of light still with just the one on.
[INDEX]