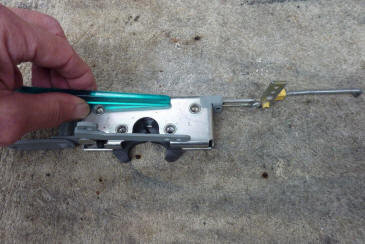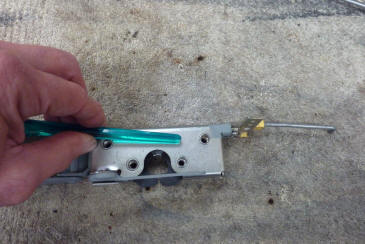

Really hard to show but the green handle is showing the position of the L shaped arm inside the latch case in its open position, hard against the back of the case. It pivots off the mounting hole by my thumb and the rest of the arm goes up the short side of the latch case to the release arm. When the latch is closed, the arm comes up to the back of the C shaped pieces and holds them closed. This is when the locking piece I added can now slide up behind it and stop it from going back to the open position.
I got new glass cut as had scratched the original ones taking them in and out so often when building out the doors originally. It was green glass that is no longer available in the country. So I had some plain glass cut and tempered and a high heat rejection tint added that has a green tinge to it to make it the same as before in colour, but better against heat. Only problem was I discovered the glaziers had not rounded the bottom corners and it would dig into the glass track. So I nervously ground a radius with a grinder with a flap disc. Just doing it a tiny bit at a time so it wouldn't heat it up and explode the tempered glass!
And what do you know, I scratched one of the panes fitting it! Least it was only the tint and had to get it redone. Can you believe everything shown, plus the glass, door cards and window surround not shown, go into these two doors!
Another change I made was making a hatch in the floor to access the battery. I decided in the end it was easier than dropping the mufflers and taking it out via the bottom. Not that noticeable in the end anyway and now was the time to do it before the floor gets bolted down with the bed panels.
Pleased to say that the door latches work so much better and the pressure relief vents are doing their job also as you can see all 4 of them flip up and open briefly at once. Truck started first go after being completely pulled apart a year ago and put back together, even on the old fuel still in the tank. Great seeing the bed panels go back on so well. I got them to final prep the side panels with the guards bolted on so it would not show any distortion once they are bolted back together after paint. The fit is perfect.
Getting an idea of the overall look of it. This is taken without a flash, but early morning sun filtering through the sky lights. Next one taken with a flash moments later and the colour really changes.
Back on all four tyres again. Looking good, if I do say so myself. The front skirts are on along with the steps.
These are the steps I changed the three rounded beads in the middle to the five flat ribs which suit better. The steps will help stop the mud and stones flicking up and hitting the front of the rear guard.
I may either coat the top of the ribs in Raptor lining or place some grip tape on it should it need them. I don't actually plan on stepping on them even though I made them strong enough to do that. Next is adding the seals to the bottom of the tonneau. Using a double bulb seal to help stop any water leaking under them. As I am not near an edge to follow, I used a grease pencil to mark where it needs to go.
I prefer a mitred corner so I can glue the very end of them together before pressing the corner down firmly. This will keep any dust and water from getting inside the seals. My wife Lisa helped me lift on the tonneau and it all lined up perfectly.
[Index]